Today I was getting this warning in my server event log:
event id 4164 and 4103
Catalog: AnchorProject. A master merge was started due to an external request.
Since it was flodding my event viewer I didnt even see the other issues there... but one of the servers CPU was in max usage all the time (100%, but since we had 2 CPU task manager shows 50% total usage)...
Well, as I was digging up more info here is what I came up with and how I solved this issue:
1: I was getting an error on a certain page from within a site ( a custom list view ) that referenced the wrong master page - /_layouts/application.master. Since the celler page was in the list and not in the /_layouts/ folder this was blocked by ASP.NET
2: The caller user was my search user, lucky it is a unique user so I could be sure it was invoked by the indexer
So, after I fixed / deleted these 2 pages - the indexer stopped trying to index them, and 30 seconds after that the errors were gone and CPU back to normal...
Hope this helps you guys too, I will update if I get more info on this.
Wednesday, September 10, 2008
Thursday, August 21, 2008
How to add MOSS search to internet explorer 7 search box
This is a rather easy and cool task...
May time people ask me how they can add their SharePoint search to the internet explorer 7 search box:
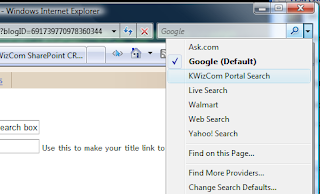
Now, I know... if you have internet access - there is no problem. Just click on the "Find more providers" and follow the instructions and you are done.
But - some customers do not have internet access on their client machine, or some administrators would like to publish this configuration through an organization... so a little registry tweaking will do the trick!
Simple take this text:
Replace the "KWizCom Portal Search" with the search provider title you want,
Replace the URL address with the one of your search page (to find out what it is - Simple do a search and copy the resutls page address), and replace the word(s) you searched for with the {searchTerms} token.
Save it as a search.reg file using notepad, and run it!
Also, you can add almost any other search provider in the same way, for example to search in KWizCom addons site you can use this search address:
http://www.kwizcom.com/search.asp?SearchString={searchTerms}&pageID=1
Easy, isn't it?
May time people ask me how they can add their SharePoint search to the internet explorer 7 search box:

Now, I know... if you have internet access - there is no problem. Just click on the "Find more providers" and follow the instructions and you are done.
But - some customers do not have internet access on their client machine, or some administrators would like to publish this configuration through an organization... so a little registry tweaking will do the trick!
Simple take this text:
Windows Registry Editor Version 5.00
[HKEY_CURRENT_USER\Software\Microsoft\Internet Explorer\SearchScopes\{33093C07-A5A2-418A-AB53-C187BC95DAED}]
"DisplayName"="KWizCom Portal Search"
"URL"="http://portal.kwizcom.com/searchcenter/Pages/Results.aspx?k={searchTerms}"
[HKEY_CURRENT_USER\Software\Microsoft\Internet Explorer\SearchScopes\{33093C07-A5A2-418A-AB53-C187BC95DAED}]
"DisplayName"="KWizCom Portal Search"
"URL"="http://portal.kwizcom.com/searchcenter/Pages/Results.aspx?k={searchTerms}"
Replace the "KWizCom Portal Search" with the search provider title you want,
Replace the URL address with the one of your search page (to find out what it is - Simple do a search and copy the resutls page address), and replace the word(s) you searched for with the {searchTerms} token.
Save it as a search.reg file using notepad, and run it!
Also, you can add almost any other search provider in the same way, for example to search in KWizCom addons site you can use this search address:
http://www.kwizcom.com/search.asp?SearchString={searchTerms}&pageID=1
Easy, isn't it?


Thursday, August 7, 2008
How to add rating field to MOSS search results?
This guide will show you how to add custom fields – specifically a KWizCom Rating field to the MOSS search results page.
This article will only demonstrate how to add the field to the results, but much more things can be achieved using simple XSL editing like: Add sorting or grouping by special fields.
This task is mainly done in 2 parts:
Part 1: Add the Rating field to the search Index Engine
Part 2: Customizing the search results page
This article assumes you have installed KWizCom Rating Field Type and created a field in a list named: “Rate” of type “Rating”. If you haven’t done so please complete these requirements before you continue.
Part 1: Add the Rating field to the search Index Engine
1. Open SharePoint Central Administration2. Browse to your Shared Services Provider (SSP)
3. At the SSP home page, please click “Search Settings”
4. Go to “Metadata Property Mappings” link
5. Click “New Managed Property”
6. Set property name to “Rating”, Type = “Decimal”
7. Select “Include values from a single crawled property based on the order specified”
 8. Click on “Add Mapping”
9. Search for your tags fields. If you do not see any of your tags fields – you may have to manually crawl the SharePoint content source before you can continue.
 10. If you have more than one property of type Rating – please search all of them and add them to this list.
11. Click OK twice to confirm the new managed property.
Part 2: Customizing the search results page
12. Browse to your search site13. Go to the results page ( or simple perform a simple search go get there)
14. Click Site Actions -> Edit Page
15. Locate the “Core Results” web part
16. Choose to modify the web part properties
First – we will add the Rating managed property to the results XML:
17. Open the “Results Query Options” group, and click to edit “Selected Columns” property
 18. Add the Managed Property “Rating” to the Column Names.
19. Next, we will have to edit the XSL for the result item template.
20. Expand the “Data View Properties” tool part, and click “XSL Editor”
 21. Locate in the XSL the template “<xsl:template match="Result">” and update it to look like this:
<!-- This template is called for each result -->
<xsl:template match="Result">
<xsl:variable name="id" select="id">
<xsl:variable name="url" select="url">
<span class="srch-Icon">
<a href="{$url}" id="{concat('CSR_IMG_',$id)}" title="{$url}">
<img align="absmiddle" src="{imageurl}" border="0" alt="{imageurl/@imageurldescription}" />
</a>
</span>
<span class="srch-Title">
<a href="{$url}" id="{concat('CSR_',$id)}" title="{$url}">
<xsl:choose>
<xsl:when test="hithighlightedproperties/HHTitle[. != '']">
<xsl:call-template name="HitHighlighting">
<xsl:with-param name="hh" select="hithighlightedproperties/HHTitle">
</xsl:call-template>
</xsl:when>
<xsl:otherwise><xsl:value-of select="title"></xsl:otherwise>
</xsl:choose>
<xsl:if test="rating > 0">
User Rating: <b><xsl:value-of select="rating"></b>
</xsl:if>
</a>
<br/>
</span>
<xsl:choose>
<xsl:when test="$IsThisListScope = 'True' and contentclass[. = 'STS_ListItem_PictureLibrary'] and picturethumbnailurl[. != '']">
<div style="padding-top: 2px; padding-bottom: 2px;">
<a href="{$url}" id="{concat('CSR_P',$id)}" title="{title}">
<img src="{picturethumbnailurl}" alt="" />
</a>
</div>
</xsl:when>
</xsl:choose>
<div class="srch-Description">
<xsl:choose>
<xsl:when test="hithighlightedsummary[. != '']">
<xsl:call-template name="HitHighlighting">
<xsl:with-param name="hh" select="hithighlightedsummary">
</xsl:call-template>
</xsl:when>
<xsl:when test="description[. != '']">
<xsl:value-of select="description">
</xsl:when>
</xsl:choose>
</div >
<p class="srch-Metadata">
<span class="srch-URL">
<a href="{$url}" id="{concat('CSR_U_',$id)}" title="{$url}" dir="ltr">
<xsl:choose>
<xsl:when test="hithighlightedproperties/HHUrl[. != '']">
<xsl:call-template name="HitHighlighting">
<xsl:with-param name="hh" select="hithighlightedproperties/HHUrl">
</xsl:call-template>
</xsl:when>
<xsl:otherwise><xsl:value-of select="url"></xsl:otherwise>
</xsl:choose>
</a>
</span>
<xsl:call-template name="DisplaySize">
<xsl:with-param name="size" select="size">
</xsl:call-template>
<xsl:call-template name="DisplayString">
<xsl:with-param name="str" select="author">
</xsl:call-template>
<xsl:call-template name="DisplayString">
<xsl:with-param name="str" select="write">
</xsl:call-template>
<xsl:call-template name="DisplayCollapsingStatusLink">
<xsl:with-param name="status" select="collapsingstatus">
<xsl:with-param name="urlEncoded" select="urlEncoded">
<xsl:with-param name="id" select="concat('CSR_CS_',$id)">
</xsl:call-template>
</p>
</xsl:template>
22. You can only add the following to the existing XSL you already had there instead of pasting the entire tag:<xsl:template match="Result">
<xsl:variable name="id" select="id">
<xsl:variable name="url" select="url">
<span class="srch-Icon">
<a href="{$url}" id="{concat('CSR_IMG_',$id)}" title="{$url}">
<img align="absmiddle" src="{imageurl}" border="0" alt="{imageurl/@imageurldescription}" />
</a>
</span>
<span class="srch-Title">
<a href="{$url}" id="{concat('CSR_',$id)}" title="{$url}">
<xsl:choose>
<xsl:when test="hithighlightedproperties/HHTitle[. != '']">
<xsl:call-template name="HitHighlighting">
<xsl:with-param name="hh" select="hithighlightedproperties/HHTitle">
</xsl:call-template>
</xsl:when>
<xsl:otherwise><xsl:value-of select="title"></xsl:otherwise>
</xsl:choose>
<xsl:if test="rating > 0">
User Rating: <b><xsl:value-of select="rating"></b>
</xsl:if>
</a>
<br/>
</span>
<xsl:choose>
<xsl:when test="$IsThisListScope = 'True' and contentclass[. = 'STS_ListItem_PictureLibrary'] and picturethumbnailurl[. != '']">
<div style="padding-top: 2px; padding-bottom: 2px;">
<a href="{$url}" id="{concat('CSR_P',$id)}" title="{title}">
<img src="{picturethumbnailurl}" alt="" />
</a>
</div>
</xsl:when>
</xsl:choose>
<div class="srch-Description">
<xsl:choose>
<xsl:when test="hithighlightedsummary[. != '']">
<xsl:call-template name="HitHighlighting">
<xsl:with-param name="hh" select="hithighlightedsummary">
</xsl:call-template>
</xsl:when>
<xsl:when test="description[. != '']">
<xsl:value-of select="description">
</xsl:when>
</xsl:choose>
</div >
<p class="srch-Metadata">
<span class="srch-URL">
<a href="{$url}" id="{concat('CSR_U_',$id)}" title="{$url}" dir="ltr">
<xsl:choose>
<xsl:when test="hithighlightedproperties/HHUrl[. != '']">
<xsl:call-template name="HitHighlighting">
<xsl:with-param name="hh" select="hithighlightedproperties/HHUrl">
</xsl:call-template>
</xsl:when>
<xsl:otherwise><xsl:value-of select="url"></xsl:otherwise>
</xsl:choose>
</a>
</span>
<xsl:call-template name="DisplaySize">
<xsl:with-param name="size" select="size">
</xsl:call-template>
<xsl:call-template name="DisplayString">
<xsl:with-param name="str" select="author">
</xsl:call-template>
<xsl:call-template name="DisplayString">
<xsl:with-param name="str" select="write">
</xsl:call-template>
<xsl:call-template name="DisplayCollapsingStatusLink">
<xsl:with-param name="status" select="collapsingstatus">
<xsl:with-param name="urlEncoded" select="urlEncoded">
<xsl:with-param name="id" select="concat('CSR_CS_',$id)">
</xsl:call-template>
</p>
</xsl:template>
<xsl:if test="rating > 0">
User Rating: <b><xsl:value-of select="rating"></b>
</xsl:if>
23. And you should get results that will resemble this:User Rating: <b><xsl:value-of select="rating"></b>
</xsl:if>
 24. For debugging reasons, should you wish to view the results RAW XML, copy the existing XSL to notepad for backup, and use this XSL instead:
<?xml version="1.0" encoding="UTF-8"?>
<xsl:stylesheet version="1.0" xsl="http://www.w3.org/1999/XSL/Transform">
<xsl:output method="xml" version="1.0" encoding="UTF-8" indent="yes">
<xsl:template match="/">
<xmp><xsl:copy-of select="*"></xmp>
</xsl:template>
</xsl:stylesheet>
<xsl:stylesheet version="1.0" xsl="http://www.w3.org/1999/XSL/Transform">
<xsl:output method="xml" version="1.0" encoding="UTF-8" indent="yes">
<xsl:template match="/">
<xmp><xsl:copy-of select="*"></xmp>
</xsl:template>
</xsl:stylesheet>
Hope this helps, if you have trouble doing it yourself we offer this customization as a part of our remote consulting services, contact sales at kwizcom.com by email for more information on that.
Thanks, Shai Petel.
Subscribe to:
Posts (Atom)