KWizCom believes in knowledge sharing and education. That is why KWizCom supports groups and institutions that promote these issues. The Markham .NET User Group is one such example.
The Markham .NET User Group was founded by Rostam Jarrah and Reza Alirezaei, experts in content management, SharePoint and more. The two felt the lack of a .NET dedicated user group in Markham, Ontario and thus decided to create one.
The group focuses on various .NET technologies at each session such as mobile, web, Office, SharePoint and other emerging .NET technologies. The main goal in mind is to enable knowledge sharing, allowing members to learn from each other and gain new insights.
KWizCom, known for supporting grade school and college education, sees importance in promoting further studies for professionals. Group synergy like that in the Markham .NET User Group creates the atmosphere to bring about advancements and solutions that can, ultimately benefit all. When education and community benefit calls - KWizCom is there, each step of the way.
Tuesday, February 24, 2009
Sunday, February 22, 2009
Add a web part to your web parts gallery using a feature
Want to add web parts to your web parts gallery using a SharePoint feature?
Let me show you the easiest way...
Background
If you want register a web part for a site collection, you should add the web part to the Web Part Gallery in the site collection.
The KWizCom Tagging Feature is convenient to use here as it allows you to see the Tags Cloud Web Part in the site collection where the Tagging Feature is activated.
It is important you understand everything in SharePoint 2007 is based on features. So - to add your web part to the web parts gallery you will need to create a special feature for your web part with the correct scope as well:
Let’s say you have sample web part named “MySampleWebPart”.
The first thing you need to do is create a folder named “MySampleWebPart” inside the Features folder: C:\Program Files\Common Files\Microsoft Shared\web server extensions\12\TEMPLATE\FEATURES\MySampleWebPart
Now, copy your “MySampleWebPart .dwp” file inside the newly created folder and create 2 XML files named “elements.xml” and “Feature.xml”.
To complete your work you should modify both XML files and then install and activate the feature.
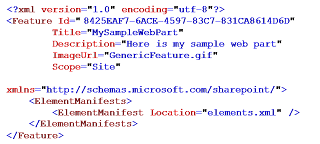
Open the “Feature.xml” file for editing (for example in notepad) and put the following XML there:
Let me show you the easiest way...
Background
If you want register a web part for a site collection, you should add the web part to the Web Part Gallery in the site collection.
The KWizCom Tagging Feature is convenient to use here as it allows you to see the Tags Cloud Web Part in the site collection where the Tagging Feature is activated.
It is important you understand everything in SharePoint 2007 is based on features. So - to add your web part to the web parts gallery you will need to create a special feature for your web part with the correct scope as well:
Let’s say you have sample web part named “MySampleWebPart”.
The first thing you need to do is create a folder named “MySampleWebPart” inside the Features folder: C:\Program Files\Common Files\Microsoft Shared\web server extensions\12\TEMPLATE\FEATURES\MySampleWebPart
Now, copy your “MySampleWebPart .dwp” file inside the newly created folder and create 2 XML files named “elements.xml” and “Feature.xml”.
To complete your work you should modify both XML files and then install and activate the feature.
Open the “Feature.xml” file for editing (for example in notepad) and put the following XML there:


Note: Each feature must have a unique ID. Please make sure that you use your own generated GUID for it.
Open the “elements.xml” file for editing (for example in notepad) and put the following XML there:
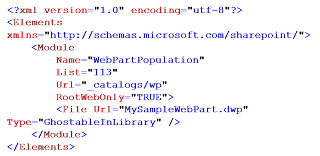
Open the “elements.xml” file for editing (for example in notepad) and put the following XML there:

Done!
Now, you can install and activate the feature that will add the web part you the Web Parts Gallery.
Install Feature
Run STSADM command:
“C:\Program Files\Common Files\Microsoft Shared\web server extensions\12\BIN\stsadm” -o installfeature –name MySampleWebPart –force
Activate Feature
After installation, you should have this new site collection feature:

Activate the feature to see the web part in web parts gallery.
Result
If you did everything correctly, you will see your web part in Web Part gallery
Now, you can install and activate the feature that will add the web part you the Web Parts Gallery.
Install Feature
Run STSADM command:
“C:\Program Files\Common Files\Microsoft Shared\web server extensions\12\BIN\stsadm” -o installfeature –name MySampleWebPart –force
Activate Feature
After installation, you should have this new site collection feature:

Activate the feature to see the web part in web parts gallery.
Result
If you did everything correctly, you will see your web part in Web Part gallery


Tuesday, February 17, 2009
How do I save a publishing site as a template?
You may have noticed that the “Save site as template menu” under “Look and Feel” site settings category is missing. This brings one to ask:
How do I get it back? And more importantly: Why was it removed?
In the following article I will answer these questions and give you tools to address this issue on your own.
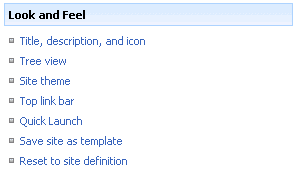
Notice you have the “Save site as template” menu option there.
It is important to understand that everything in SharePoint 2007 is based on features. So – you would be correct to assume this menu option is also a feature:
When you create a publishing portal site (internet facing or intra net collaboration portal) you will notice that among other changes, the “Look and Feel” site settings category has changed, a lot:
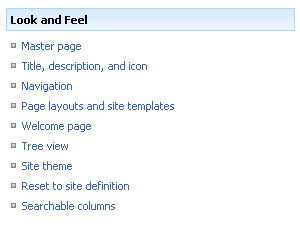
Notice, there is no longer the option to "save site as template".
So, keeping in mind that everything in SharePoint is controlled by features – think of a publishing site as a normal WSS sites that had some features activated in it (*this is not 100% accurate, but as it simplifies things we will say so, for the sake of the example).
Looking further in our Feature folder, you will easily find several feature folders that belong to the publishing site. One of these features calls you to hide the save as template menu from the site settings:
Notice the use of the HideCustomAction tag, with the corresponding HideActionld “SaveAsTemplate”.
Many of my customers use publishing sites. A lot of them tried to use the save as template option (some using code, some using a feature like the one below) and we all came to the same conclusion:
Since publishing sites have pages in them and layouts that are all connected to a content type that is configured at the top level site of the site collection, and because these content types are not saved and moved within the site template STP file – the STP file not, as one would expect it to be, a true reflection of the original site.
This means that if you save a publishing site as template and use it in the same site collection, providing all site content types it uses remain unchanged, the site template will work properly.
The problem arises when you try to move the site template to a different site collection, or when you've changed or deleted some content types in your current site collection – this will result in unexpected behaviour (that from my experience is irritating but fixable, with some work).
So, if you want to use the site templates within the same site collection, or if you use only the out of the box content types (welcome and article) with no changes, you should have no difficulties.
Here is what you need to do to add this option back to your publishing site. It's very simple; it will take approximately five minutes of work!
Simply create, install and activate a feature that will bring this menu option back to life!
Create feature
Create a feature that re-registers a “save as template” action to site settings. I said 5 minutes, right? So here is a feature ready to use (it's my free gift to you! ;)
Save the folder inside the ZIP file, under your server’s features folder.
Install Feature
Run STSADM command:
"C:\Program Files\Common Files\Microsoft Shared\web server extensions\12\BIN\stsadm" -o installfeature -name AddSaveTemplateToPublishingSiteSettings –force
Activate Feature
After installation, you should have this new site collection feature:

Result
If you did everything correctly, your new publishing site settings “Look and Feel” section will appear like this:
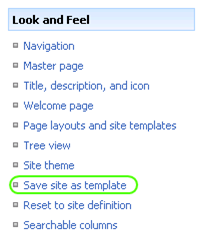
You will now be able to "save site as template".
Easy, huh?!
* There may be other side effects of saving a publishing site as template. This article is for the community information benefit only and will not hold KWizCom responsible to any issues caused by this. It is strongly recommended you test on a pre production environment before you use this tip in a production server.
How do I get it back? And more importantly: Why was it removed?
In the following article I will answer these questions and give you tools to address this issue on your own.
Background
In WSS sites, when you go to site settings page, this is how your “Look and Feel” category looks:
Notice you have the “Save site as template” menu option there.
It is important to understand that everything in SharePoint 2007 is based on features. So – you would be correct to assume this menu option is also a feature:
Feature folder: C:\Program Files\Common Files\Microsoft Shared\web server extensions\12\TEMPLATE\FEATURES\SiteSettings
Feature file: SiteSettings.xml
Definition:
<customaction id="SaveAsTemplate" title="$Resources:SiteSettings_SaveAsTemplate_Title;" location="Microsoft.SharePoint.SiteSettings" groupid="Customization" rights="AddAndCustomizePages,BrowseDirectories,ManagePermissions,ManageSubwebs,ManageWeb,UseRemoteAPIs,ViewFormPages" sequence="60"><customaction id="SaveAsTemplate" title="$Resources:SiteSettings_SaveAsTemplate_Title;" location="Microsoft.SharePoint.SiteSettings" groupid="Customization" rights="AddAndCustomizePages,BrowseDirectories,ManagePermissions,ManageSubwebs,ManageWeb,UseRemoteAPIs,ViewFormPages" sequence="60"><customaction id="SaveAsTemplate" title="$Resources:SiteSettings_SaveAsTemplate_Title;" location="Microsoft.SharePoint.SiteSettings" groupid="Customization" rights="AddAndCustomizePages,BrowseDirectories,ManagePermissions,ManageSubwebs,ManageWeb,UseRemoteAPIs,ViewFormPages" sequence="60"><customaction id="SaveAsTemplate" title="$Resources:SiteSettings_SaveAsTemplate_Title;" location="Microsoft.SharePoint.SiteSettings" groupid="Customization" rights="AddAndCustomizePages,BrowseDirectories,ManagePermissions,ManageSubwebs,ManageWeb,UseRemoteAPIs,ViewFormPages" sequence="60"><customaction id="SaveAsTemplate" title="$Resources:SiteSettings_SaveAsTemplate_Title;" location="Microsoft.SharePoint.SiteSettings" groupid="Customization" rights="AddAndCustomizePages,BrowseDirectories,ManagePermissions,ManageSubwebs,ManageWeb,UseRemoteAPIs,ViewFormPages" sequence="60"><customaction id="SaveAsTemplate" title="$Resources:SiteSettings_SaveAsTemplate_Title;" location="Microsoft.SharePoint.SiteSettings" groupid="Customization" rights="AddAndCustomizePages,BrowseDirectories,ManagePermissions,ManageSubwebs,ManageWeb,UseRemoteAPIs,ViewFormPages" sequence="60"><customaction id="SaveAsTemplate" title="$Resources:SiteSettings_SaveAsTemplate_Title;" location="Microsoft.SharePoint.SiteSettings" groupid="Customization" rights="AddAndCustomizePages,BrowseDirectories,ManagePermissions,ManageSubwebs,ManageWeb,UseRemoteAPIs,ViewFormPages" sequence="60">
<urlaction url="_layouts/savetmpl.aspx">
</customaction></customaction>
<urlaction url="_layouts/savetmpl.aspx"></customaction><urlaction url="_layouts/savetmpl.aspx"></customaction>
<urlaction url="_layouts/savetmpl.aspx"></customaction><urlaction url="_layouts/savetmpl.aspx"></customaction><urlaction url="_layouts/savetmpl.aspx"></customaction>
Feature file: SiteSettings.xml
Definition:
<customaction id="SaveAsTemplate" title="$Resources:SiteSettings_SaveAsTemplate_Title;" location="Microsoft.SharePoint.SiteSettings" groupid="Customization" rights="AddAndCustomizePages,BrowseDirectories,ManagePermissions,ManageSubwebs,ManageWeb,UseRemoteAPIs,ViewFormPages" sequence="60"><customaction id="SaveAsTemplate" title="$Resources:SiteSettings_SaveAsTemplate_Title;" location="Microsoft.SharePoint.SiteSettings" groupid="Customization" rights="AddAndCustomizePages,BrowseDirectories,ManagePermissions,ManageSubwebs,ManageWeb,UseRemoteAPIs,ViewFormPages" sequence="60"><customaction id="SaveAsTemplate" title="$Resources:SiteSettings_SaveAsTemplate_Title;" location="Microsoft.SharePoint.SiteSettings" groupid="Customization" rights="AddAndCustomizePages,BrowseDirectories,ManagePermissions,ManageSubwebs,ManageWeb,UseRemoteAPIs,ViewFormPages" sequence="60"><customaction id="SaveAsTemplate" title="$Resources:SiteSettings_SaveAsTemplate_Title;" location="Microsoft.SharePoint.SiteSettings" groupid="Customization" rights="AddAndCustomizePages,BrowseDirectories,ManagePermissions,ManageSubwebs,ManageWeb,UseRemoteAPIs,ViewFormPages" sequence="60"><customaction id="SaveAsTemplate" title="$Resources:SiteSettings_SaveAsTemplate_Title;" location="Microsoft.SharePoint.SiteSettings" groupid="Customization" rights="AddAndCustomizePages,BrowseDirectories,ManagePermissions,ManageSubwebs,ManageWeb,UseRemoteAPIs,ViewFormPages" sequence="60"><customaction id="SaveAsTemplate" title="$Resources:SiteSettings_SaveAsTemplate_Title;" location="Microsoft.SharePoint.SiteSettings" groupid="Customization" rights="AddAndCustomizePages,BrowseDirectories,ManagePermissions,ManageSubwebs,ManageWeb,UseRemoteAPIs,ViewFormPages" sequence="60"><customaction id="SaveAsTemplate" title="$Resources:SiteSettings_SaveAsTemplate_Title;" location="Microsoft.SharePoint.SiteSettings" groupid="Customization" rights="AddAndCustomizePages,BrowseDirectories,ManagePermissions,ManageSubwebs,ManageWeb,UseRemoteAPIs,ViewFormPages" sequence="60">
<urlaction url="_layouts/savetmpl.aspx">
</customaction></customaction>
<urlaction url="_layouts/savetmpl.aspx"></customaction><urlaction url="_layouts/savetmpl.aspx"></customaction>
<urlaction url="_layouts/savetmpl.aspx"></customaction><urlaction url="_layouts/savetmpl.aspx"></customaction><urlaction url="_layouts/savetmpl.aspx"></customaction>
When you create a publishing portal site (internet facing or intra net collaboration portal) you will notice that among other changes, the “Look and Feel” site settings category has changed, a lot:

Notice, there is no longer the option to "save site as template".
So, keeping in mind that everything in SharePoint is controlled by features – think of a publishing site as a normal WSS sites that had some features activated in it (*this is not 100% accurate, but as it simplifies things we will say so, for the sake of the example).
Looking further in our Feature folder, you will easily find several feature folders that belong to the publishing site. One of these features calls you to hide the save as template menu from the site settings:
Feature folder: C:\Program Files\Common Files\Microsoft Shared\web server extensions\12\TEMPLATE\FEATURES\Publishing
Feature file: PublishingSiteSettings.xml
Definition:
<hidecustomaction id="HideSaveAsTemplate" location="Microsoft.SharePoint.SiteSettings" groupid="Customization" hideactionid="SaveAsTemplate"><hidecustomaction id="HideSaveAsTemplate" location="Microsoft.SharePoint.SiteSettings" groupid="Customization" hideactionid="SaveAsTemplate"><hidecustomaction id="HideSaveAsTemplate" location="Microsoft.SharePoint.SiteSettings" groupid="Customization" hideactionid="SaveAsTemplate"><hidecustomaction id="HideSaveAsTemplate" location="Microsoft.SharePoint.SiteSettings" groupid="Customization" hideactionid="SaveAsTemplate">
Feature file: PublishingSiteSettings.xml
Definition:
<hidecustomaction id="HideSaveAsTemplate" location="Microsoft.SharePoint.SiteSettings" groupid="Customization" hideactionid="SaveAsTemplate"><hidecustomaction id="HideSaveAsTemplate" location="Microsoft.SharePoint.SiteSettings" groupid="Customization" hideactionid="SaveAsTemplate"><hidecustomaction id="HideSaveAsTemplate" location="Microsoft.SharePoint.SiteSettings" groupid="Customization" hideactionid="SaveAsTemplate"><hidecustomaction id="HideSaveAsTemplate" location="Microsoft.SharePoint.SiteSettings" groupid="Customization" hideactionid="SaveAsTemplate">
Notice the use of the HideCustomAction tag, with the corresponding HideActionld “SaveAsTemplate”.
Why is the “Save site as template” menu option removed from publishing sites?
Many of my customers use publishing sites. A lot of them tried to use the save as template option (some using code, some using a feature like the one below) and we all came to the same conclusion:
Since publishing sites have pages in them and layouts that are all connected to a content type that is configured at the top level site of the site collection, and because these content types are not saved and moved within the site template STP file – the STP file not, as one would expect it to be, a true reflection of the original site.
This means that if you save a publishing site as template and use it in the same site collection, providing all site content types it uses remain unchanged, the site template will work properly.
The problem arises when you try to move the site template to a different site collection, or when you've changed or deleted some content types in your current site collection – this will result in unexpected behaviour (that from my experience is irritating but fixable, with some work).
So, if you want to use the site templates within the same site collection, or if you use only the out of the box content types (welcome and article) with no changes, you should have no difficulties.
How do I add the “Save site as template” option back to publishing sites?
Here is what you need to do to add this option back to your publishing site. It's very simple; it will take approximately five minutes of work!
Simply create, install and activate a feature that will bring this menu option back to life!
Create feature
Create a feature that re-registers a “save as template” action to site settings. I said 5 minutes, right? So here is a feature ready to use (it's my free gift to you! ;)
Save the folder inside the ZIP file, under your server’s features folder.
Install Feature
Run STSADM command:
"C:\Program Files\Common Files\Microsoft Shared\web server extensions\12\BIN\stsadm" -o installfeature -name AddSaveTemplateToPublishingSiteSettings –force
Activate Feature
After installation, you should have this new site collection feature:

Result
If you did everything correctly, your new publishing site settings “Look and Feel” section will appear like this:

You will now be able to "save site as template".
Easy, huh?!
* There may be other side effects of saving a publishing site as template. This article is for the community information benefit only and will not hold KWizCom responsible to any issues caused by this. It is strongly recommended you test on a pre production environment before you use this tip in a production server.
Subscribe to:
Posts (Atom)