Want to add web parts to your web parts gallery using a SharePoint feature?
Let me show you the easiest way...
Background
If you want register a web part for a site collection, you should add the web part to the Web Part Gallery in the site collection.
The KWizCom Tagging Feature is convenient to use here as it allows you to see the Tags Cloud Web Part in the site collection where the Tagging Feature is activated.
It is important you understand everything in SharePoint 2007 is based on features. So - to add your web part to the web parts gallery you will need to create a special feature for your web part with the correct scope as well:
Let’s say you have sample web part named “MySampleWebPart”.
The first thing you need to do is create a folder named “MySampleWebPart” inside the Features folder: C:\Program Files\Common Files\Microsoft Shared\web server extensions\12\TEMPLATE\FEATURES\MySampleWebPart
Now, copy your “MySampleWebPart .dwp” file inside the newly created folder and create 2 XML files named “elements.xml” and “Feature.xml”.
To complete your work you should modify both XML files and then install and activate the feature.
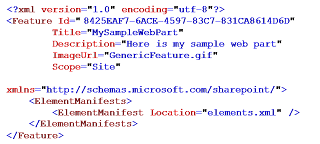
Open the “Feature.xml” file for editing (for example in notepad) and put the following XML there:

Note: Each feature must have a unique ID. Please make sure that you use your own generated GUID for it.
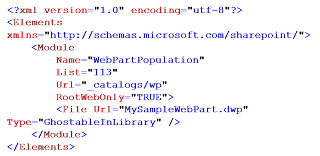
Open the “elements.xml” file for editing (for example in notepad) and put the following XML there:

Open the “elements.xml” file for editing (for example in notepad) and put the following XML there:

Done!
Now, you can install and activate the feature that will add the web part you the Web Parts Gallery.
Install Feature
Run STSADM command:
“C:\Program Files\Common Files\Microsoft Shared\web server extensions\12\BIN\stsadm” -o installfeature –name MySampleWebPart –force
Activate Feature
After installation, you should have this new site collection feature:

Activate the feature to see the web part in web parts gallery.
Result
If you did everything correctly, you will see your web part in Web Part gallery
Now, you can install and activate the feature that will add the web part you the Web Parts Gallery.
Install Feature
Run STSADM command:
“C:\Program Files\Common Files\Microsoft Shared\web server extensions\12\BIN\stsadm” -o installfeature –name MySampleWebPart –force
Activate Feature
After installation, you should have this new site collection feature:

Activate the feature to see the web part in web parts gallery.
Result
If you did everything correctly, you will see your web part in Web Part gallery
1 comment:
I am unable to add the webpart to webpart gallery
Post a Comment